
- Power Tools
-

Saws
Chain Saw Concrete Chain Saw Band Saw Reciprocating Saw ...
-

Cutters
Pneumatic Cutter Pipe Cutting Machine Nut Cutter
-

Drills
Hammer Drill Pistol Hammer Drill Two Hand Operation Drill Column Drill ...
-

Impact Wrenches
Pneumatic Impact Wrench (Ex-proof Series) Pneumatic Impact Wrench (Ultra light Series) Emulsion Impact Wrench Nut Runner ...
-
Torque Wrenches
Pneumatic Torque Wrench Electric Torque Wrench Hydraulic Torque Wrench Hollow Hydraulic Wrench ...
-

Mining Waterjet Cutting Machine
Electric Mining Waterjet Cutting Machine Pneumatic Mining Waterjet Cutting Machine Emulsion Mining Waterjet Cutting Machine
-

Hammers
Pneumatic Chipping Hammer Hydraulic Chipping Hammer
-

Scaler
Pneumatic Long Reach Scaler
-
Rammer
Pneumatic Rammer
-

Grinders
Wet Grinder Angel Grinder Electric Grinder
-

Fan
Pneumatic Fan Heavy Fixed Fan
-

Hoist
Chain Hoist Electric Hoist Pneumatic Hoist Hydraulic Hoist ...
-

Winch
Pneumatic Winch
-

Pump
Pneumatic Submersible Pump Emulsion Submersible Pump
-

Assembly
Torque Multipler C-Hog Ring Plier
-
- Accessories
-

Cutting
Chainsaw Concrete Chainsaw Band Saw Reciprocating Saw ...
-

Drilling
Impact Drills Light Drills Magnetic Drills丨Rail Drills Balance Drills丨Angle Drills ...
-

Assembly
Impact Wrenches C-Hog Ring Plier
-

Hammer & Shovel
Chipping Hammer Derusting Shovel
-

Grinding
Grinders
-

Hydraulic Accessories
Nut Runner Cutter
-

General Accessories
Waterjet Cutting Machine Filter assy. Filter assy. Water Pump ...
-
- Company Profile
- Service
- News
-

Events
The 21st 2023 Taiyuan Coal (En The 17th Yulin International C The 20th TaiYuan (2021) Coal ( The 16th Ordors International Have a machine repaired or hav ...
-

Case Study
Specifications of adjustable w Have a machine repaired or hav
-

Industry News
Using Chainsaws to Cut Snow? What to do if the pneumatic wr Hydraulic chain saw Operation of the wrench Introduction to the principle ...
-
- Download
- Contact


 You are here: >
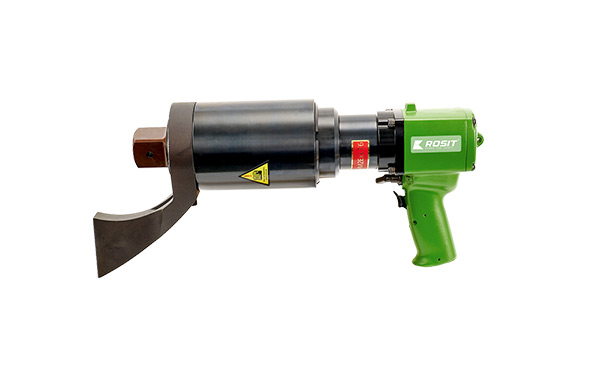
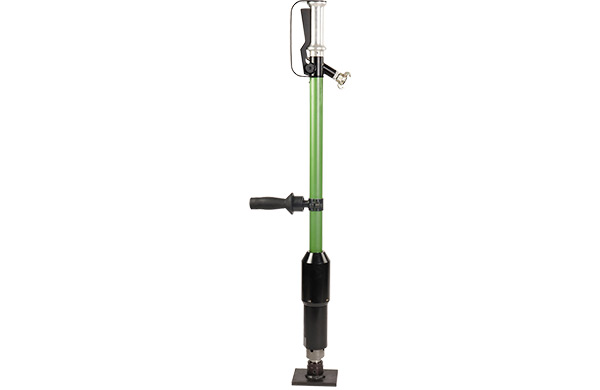
Instructions for safe operation of using hollow wrench.Air impact wrench
source:Industry News release time:2022-05-17 Article author:yu Popular:Air band saw
")
Prepare
1. Determine whether to loosen or loosen the locking screw, remove the upper and lower steering shafts, install the rotating shaft locator, drag down the reaction force locking device, install the reaction force arm in the proper position, loosen and lock the square. The working direction of the axis.
2. Connect the pump room
The high pressure inlet and outlet (a) of the pump are connected with the high pressure channel (h) of the hollow wrench, and the low voltage inlet and outlet (b) of the pump are respectively connected with the low voltage channel (r) of the hydraulic press wrench according to the hydraulic oil pipe. When connecting, insert the quick connector on the oil pipe into the top, and then tighten the fixed nut by hand.
3. Carefully check whether the high-pressure hose can be connected to a reliable one, and whether there is organic oil in the pump.
4. Connect the power cord plug of the pump.
Do not operate the diaphragm vacuum pump!
test run
◆ Place the wrench on free ground.
Turn on the main power switch of the oil pump, run the oil pump, and check whether the oil pump is working normally.
◆Press the last button on the power switch of the wired controller, then the square shaft gradually rotates, the hollow wrench stops rotating in time, and the pressure gauge rises rapidly from 0 to the set pressure; release the button, the wrench will automatically return, repeat a few times. Back, make the wrench high speed several times, observe the rotation direction of the wrench, and make sure it is loose or locked. Put the wrench on the socket specification only if there is no abnormality.
operate
◆ Adjust the pressure
Press and hold the button on the power switch of the remote control with one hand, then the square shaft gradually starts to rotate, the hollow wrench does not stop rotating in time, the pressure gauge increases from 0 speed, and the other hand adjusts and decompresses the oil pump during operation valve, adjust the needle in the pressure table to the desired asset pressure.
◆ Loosen
Adjust the pressure of the pump room to the A value, determine the rotation direction of the hollow wrench as the loose position, put the wrench on the socket specification, find the reaction force support, keep it for a long time, repeat the posture of the second and third items until it is removed. down the nut.
◆ Lock
Ⅰ. Torque setting
, the torque can be set according to the design scheme. If there is no design torque, it is recommended to set the torque according to the data information in Table 1.
Ⅱ. Pump room pressure setting
Set the pump room pressure according to the required torque and type of wrench (refer to the instructions for use)
Ⅲ. Make sure that a wrench is turned into a locked position, and the wrench can be placed on the working sleeve specification and the position of the third item in the second item is continuously performed until the nut does not move.
warn
In order to prevent accidental injury and the possibility of damaging the machine and equipment, ensure that each hollow wrench hydraulic system can bear the pressure of 70 MPa.
Can not exceed the stable load of machinery and equipment (70Mpa)
The pressure gauge in the application software indicates the working load. The pressure gauge has dialog boxes that generate conditions in the system software.
When using the photoelectric hollow wrench hydraulic press wrench, it is not allowed to exceed its allowable large working torque.
Warning: Replace damaged parts with original parts as soon as possible.
In the application, the high pressure oil pipe should be prevented from being seriously bent and coiled. Applying bent or coiled tubing can cause excessive back pressure.
Do not drop or press hanging objects on the pipe. The more serious impact is likely to cause damage to the iron wire in the oil pipeline, and the oil pipeline is likely to crack during the whole process of charging.
In order to prevent damage and damage to machinery and equipment and life safety, do not remove the rain shield on the hollow wrench body, do not modify the wrench and accessories, and do not change the valve on the hydraulic rotary joint.
Read recommendations:
related articles
Using Chainsaws to Cut Snow?
2024-05-21What to do if the pneumatic wrench is weak
2022-12-19Hydraulic chain saw
2022-12-13Operation of the wrench
2022-12-06Introduction to the principle of pneumatic wrench
2022-11-28How to use the pneumatic wrench
2022-11-21Brief introduction to the principle of pneumatic wrench
2022-11-14Impact pneumatic wrench
2022-11-07Correct hydraulic wrench operation procedure
2022-11-01Hydraulic wrench torque pressure conversion
2022-11-01Field operation procedure of hydraulic wrench
2022-10-24Hydraulic radial plunger motor
2022-10-17The history of hydraulic motors
2022-10-17Principle of balance hydraulic wrench
2022-10-10The Price Factor of Smart Electric Torque Wrench
2022-10-10Introduction to the advantages of using intelligent electric torque wrench
2022-10-10The Price Factor of Smart Electric Torque Wrench
2022-10-10Classification and use of wrenches
2022-10-10hydraulic wrench pressure conversion
2022-10-10Introduction to the advantages of the use of intelligent electric torque wrench
2022-10-10Smart Electric Torque Wrench Selection Guide
2022-10-10Intelligent electric torque wrench for wind power generation
2022-10-09Uses of open-end wrenches.Pneumatic chainsaw
2022-10-08What are the driving parts of a hydraulic wrench and what they do
2022-09-30What are the driving parts of a hydraulic wrench and what they do
2022-09-23the commonly used wrenches
2022-09-22Introduction of several common wrenches
2022-09-21Application scope and daily maintenance method of hydraulic bolt tensioner
2022-09-20Characteristics of hollow hydraulic wrench and precautions for use
2022-09-19Characteristics and precautions of driving hydraulic wrench
2022-09-17Power Tools
CS21-120丨Pneumatic Handheld Circular Saw
2023-06-17LH11-005 Electric Hoist
2023-05-11LH23-1/2 Pneumatic Hoist
2022-12-29AN23-4500 Pneumatic Torque Wrench (Angle Shaft)
2024-03-12DB21-020 Pneumatic Rotary Drill Heavy Duty
2023-06-19DM22-023 Pneumatic Rail Drill
2023-06-19CC22-430 Pneumatic Chain Saw (5.0KW Series)
2023-06-14DM11-050 Electric Magnetic Drill
2022-12-30CB22-200 Pneumatic Band Saw - Stainless Steel Series
2023-06-16OW62-020 Integrated Emulsion Mining Waterjet Cutting Machine
2023-05-10CB11-120 Electric Band Saw
2020-06-13CC22-530 Pneumatic Chain Saw (5.0KW Series)
2023-06-14CD22-500 Pneumatic Concrete Chainsaw (5.0KW)
2023-06-16CS31-160 Hydraulic Handheld Circular Saw
2023-06-17DM31-016 Hydraulic Magnetic Drill
2023-06-19LW21-010 Pneumatic Winch
2023-01-06CD31-500 Hydraulic Concrete Chainsaw
2023-06-16CB61-210丨Emulsion Band Saw
2023-05-18CS31-120 Hydraulic Handheld Circular Saw
2022-12-09LH22-016 Pneumatic Hoist
2023-06-29DH21-030 Pneumatic Hammer Drill
2021-06-10CN22-5060 Nut Cutter丨Split-type Nut Cutter
2022-12-12AN71-3500 Torque Multiplier
2023-06-29AN31-48000 Hydraulic Torque Wrench
2023-06-27DC21-300 Pneumatic Core Drill
2023-01-03CC21-380 Pneumatic Chainsaw (3.0 kw Series)
2022-12-08GP21-060 Pneumatic Submersible Pump
2022-12-29AN32-17000 Hollow Hydraulic Wrench
2023-06-27AN22-8000 Pneumatic Torque Wrench (straight shaft)
2023-06-27AN31-70000 Hydraulic Torque Wrench
2023-06-27Accessories
Optional Accessories
2023-06-07Water Pump
2020-06-13Carborundum saw Blades
2023-06-06Shovel Blades
2023-06-07Hard Alloy Hollow Drill Bits assy.丨DB84 Series
2023-06-07Alloy Twist Drill Bits
2023-06-06Alloy Drill Bits丨812 Series
2023-06-06Cutting Blades
2023-06-07Filter assy.
2023-06-07Carborundum Saw Chains
2023-06-06Pipe Fixed Clamps丨CB861-18
2023-06-06Core Drill Morse Taper Sleeves
2023-06-07Diamond Saw Chains丨CC813 Series
2023-06-06Alloy Saw Blades丨CR812 Series
2023-06-06Tool Bits
2023-06-07Filter assy.
2023-06-07Carbide Hollow Bits丨DM816 Series
2023-06-06Alloy Saw Chains丨CC812/CC816 Series
2023-06-06Cross Clamps丨CB862-22
2023-06-06Pipe Fixed Clamps丨CB861-12
2023-06-06Ex-proof Sleeves KIT
2023-06-07Alloy Drill Bits丨811 Series
2023-06-06Pin
2023-06-07Carbide Inserts Twist Bits丨DB82 Series
2023-06-06Alloy Saw Blades丨CR816 Series
2023-06-06Clamps
2023-06-06Chisels
2023-06-07Carbide Inserts Twist Bits assy.丨DB83 Series
2023-06-07Diamond Saw Chains
2020-06-13Abrasive Blades
2023-06-07


