
- Power Tools
-

Saws
Chain Saw Concrete Chain Saw Band Saw Reciprocating Saw ...
-

Cutters
Pneumatic Cutter Pipe Cutting Machine Nut Cutter
-

Drills
Hammer Drill Pistol Hammer Drill Two Hand Operation Drill Column Drill ...
-

Impact Wrenches
Pneumatic Impact Wrench (Ex-proof Series) Pneumatic Impact Wrench (Ultra light Series) Emulsion Impact Wrench Nut Runner ...
-
Torque Wrenches
Pneumatic Torque Wrench Electric Torque Wrench Hydraulic Torque Wrench Hollow Hydraulic Wrench ...
-

Mining Waterjet Cutting Machine
Electric Mining Waterjet Cutting Machine Pneumatic Mining Waterjet Cutting Machine Emulsion Mining Waterjet Cutting Machine
-

Hammers
Pneumatic Chipping Hammer Hydraulic Chipping Hammer
-

Scaler
Pneumatic Long Reach Scaler
-
Rammer
Pneumatic Rammer
-

Grinders
Wet Grinder Angel Grinder Electric Grinder
-

Fan
Pneumatic Fan Heavy Fixed Fan
-

Hoist
Chain Hoist Electric Hoist Pneumatic Hoist Hydraulic Hoist ...
-

Winch
Pneumatic Winch
-

Pump
Pneumatic Submersible Pump Emulsion Submersible Pump
-

Assembly
Torque Multipler C-Hog Ring Plier
-
- Accessories
-

Cutting
Chainsaw Concrete Chainsaw Band Saw Reciprocating Saw ...
-

Drilling
Impact Drills Light Drills Magnetic Drills丨Rail Drills Balance Drills丨Angle Drills ...
-

Assembly
Impact Wrenches C-Hog Ring Plier
-

Hammer & Shovel
Chipping Hammer Derusting Shovel
-

Grinding
Grinders
-

Hydraulic Accessories
Nut Runner Cutter
-

General Accessories
Waterjet Cutting Machine Filter assy. Filter assy. Water Pump ...
-
- Company Profile
- Service
- News
-

Events
The 21st 2023 Taiyuan Coal (En The 17th Yulin International C The 20th TaiYuan (2021) Coal ( The 16th Ordors International Have a machine repaired or hav ...
-

Case Study
Specifications of adjustable w Have a machine repaired or hav
-

Industry News
Using Chainsaws to Cut Snow? What to do if the pneumatic wr Hydraulic chain saw Operation of the wrench Introduction to the principle ...
-
- Download
- Contact


 You are here: >
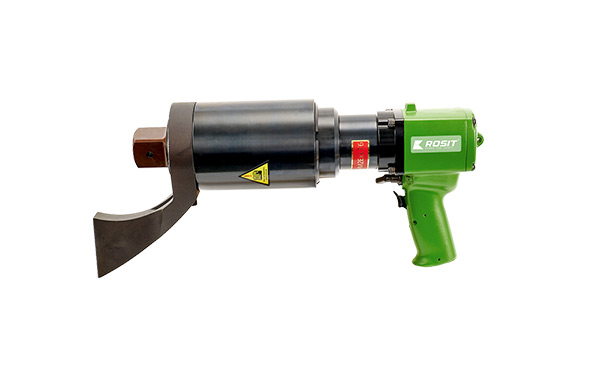
Precautions for the use of hydraulic wrenches
source:Industry News release time:2021-03-24 Article author:Rosit Popular:Air band saw
For the installation and disassembly of large-size bolts, Rehn hydraulic wrenches are indispensable tools. When using hydraulic wrenches, you must follow rigorous operating procedures. Incorrect operations will not only reduce the expected effect or even damage the hydraulic pressure. Wrenches and those that caused engineering accidents, today Rein will introduce you some precautions for the use of hydraulic wrenches.
")
Precautions for the use of rain hydraulic wrench
1. At the very beginning, what people have to do first is to determine this loosening action, or what people still need to use is to lock the nut and then press down or unscrew the locking screw.
2. Taking out some drive shafts and reversing them.
3. Later, people can install some related drive square axis positioners on it, pull down the reaction arm locking device, install the reaction arm according to the appropriate orientation, and determine the direction of the square axis during loosening and locking. .
Check before use of Wren hydraulic wrench:
1) Electric hydraulic pumps should not be used in flammable and explosive environments. Pneumatic hydraulic pumps should be used.
2) Check that the working voltage of the electric pump meets 220V.
3) Check the triple device of hydraulic wrench pump pressure adjustment, filtration and oil injection, perform drainage, add 46# anti-wear hydraulic oil, and adjust the intake pressure.
4) Check that the oil level of the oil mark of the hydraulic oil pump is above the 0 line, and the hydraulic oil is clear and transparent. Special hydraulic oil should be added, and other oils are strictly prohibited.
5) Check whether the ultra-high pressure hose is bent or damaged; when connecting, straighten out the hose without tangling, wipe the plug and socket clean and free of dirt, insert the quick-release connector to the end to ensure the connection is reliable, and lock the threaded sleeve by hand , Otherwise the one-way valve in the quick-fitting joint will not open and cannot supply oil normally.
Operating procedure:
1) The function of the wire-controlled switch button: press the (RUN) button, the oil cylinder advances; release the button, the oil cylinder automatically resets. Press the (STOP) button to stop the oil pump.
2) Before starting the hydraulic pump, first open (unscrew) the pressure regulating valve, then turn on the power (ON) to check whether the hydraulic pump is running normally; then click the remote control button several times and run for a few minutes to adjust the pressure to the required level Preset pressure value. The rated pressure is 70Mpa.
3) When adjusting the pressure, you should hold down the remote control button. When you hear the wrench "snap", the quick release lever jumps down, the wrench stops rotating when the wrench is in place, the pressure gauge rises rapidly from 0, and the other hand slowly adjusts the pressure regulating valve upwards , And can be locked with a lock nut.
4) Dry running, put the hydraulic wrench on the ground, press the (RUN) button, the wrench starts to rotate, when you hear a "pop" of the wrench, the wrench is in place and stop rotating; at this time, let go of the button and the wrench will automatically reset. When you hear a "pop" of the wrench, the reset is complete. Namely: RUN—advance—slap—release—reset—slap. Repeat a few working cycles and observe that the wrench rotates without abnormality, and you can put the wrench on the nut to work.
5) Loosen the nut: Adjust the pressure of the hydraulic pump to the highest (70Mpa), confirm that the wrench turns to the loosening direction, find the reaction fulcrum, be stable, and repeat the forward and backward working cycle of the cylinder. If the nut cannot be removed, take measures to remove rust. If the nut cannot be removed, use a larger hydraulic wrench.
6) Locking the nut: check the torque correspondence table to determine the pressure setting of the hydraulic pump, confirm that the wrench turns to the locking direction, find the reaction fulcrum, be stable, and repeat the forward and backward working cycle of the cylinder until the nut does not move.
7) When the hydraulic wrench operation stops, the power should be turned off in time.
8) Cut off the power after the work is completed, press the pressure relief valve to remove the residual pressure of the system, fully open the pressure regulating valve, and then remove the oil pipe.
9) When carrying the wrench, the oil pipe must be removed.
Read recommendations:
RC21-850 Pneumatic Long Reach Scalers
AK22-080 Pneumatic C-Hog Ring Plier (2.0 coil)
How to Keep the Chain Saw If It Is Not Used for a Long Time?
related articles
Using Chainsaws to Cut Snow?
2024-05-21What to do if the pneumatic wrench is weak
2022-12-19Hydraulic chain saw
2022-12-13Operation of the wrench
2022-12-06Introduction to the principle of pneumatic wrench
2022-11-28How to use the pneumatic wrench
2022-11-21Brief introduction to the principle of pneumatic wrench
2022-11-14Impact pneumatic wrench
2022-11-07Correct hydraulic wrench operation procedure
2022-11-01Hydraulic wrench torque pressure conversion
2022-11-01Field operation procedure of hydraulic wrench
2022-10-24Hydraulic radial plunger motor
2022-10-17The history of hydraulic motors
2022-10-17Principle of balance hydraulic wrench
2022-10-10The Price Factor of Smart Electric Torque Wrench
2022-10-10Introduction to the advantages of using intelligent electric torque wrench
2022-10-10The Price Factor of Smart Electric Torque Wrench
2022-10-10Classification and use of wrenches
2022-10-10hydraulic wrench pressure conversion
2022-10-10Introduction to the advantages of the use of intelligent electric torque wrench
2022-10-10Smart Electric Torque Wrench Selection Guide
2022-10-10Intelligent electric torque wrench for wind power generation
2022-10-09Uses of open-end wrenches.Pneumatic chainsaw
2022-10-08What are the driving parts of a hydraulic wrench and what they do
2022-09-30What are the driving parts of a hydraulic wrench and what they do
2022-09-23the commonly used wrenches
2022-09-22Introduction of several common wrenches
2022-09-21Application scope and daily maintenance method of hydraulic bolt tensioner
2022-09-20Characteristics of hollow hydraulic wrench and precautions for use
2022-09-19Characteristics and precautions of driving hydraulic wrench
2022-09-17Power Tools
GP21-060 Pneumatic Submersible Pump
2022-12-29LH23-3/6 Pneumatic Hoist
2023-06-29GG11-140 Electric Angle Grinder
2023-06-28GP61-200 Emulsion Submersible Pump
2023-06-29CS22-180 Pneumatic Trolley Circular Saw
2021-06-08AW21-4000 Pneumatic Impact Wrench (Ex-proof Series)
2022-12-19LH11 Series Manual Chain Hoist
2023-05-11AN51-600 Charging CNC Torque Wrench
2022-12-27AK51-030 Pneumatic C-Hog Ring Plier (Charging/Manual 1.5 coil)
2022-12-12GG11-178 Electric Angle Grinder
2022-12-28CC22-380 Pneumatic ChainSaw (5.0KW Series)
2020-06-13DP22-200 Pneumatic Column Drill
2023-06-19DH21-026 Pneumatic Hammer Drill
2021-06-10CS21-120丨Pneumatic Handheld Circular Saw
2023-06-17AW22-3500 Pneumatic Impact Wrench (Ultra-Light Series)
2021-06-15AN11-2000 Electric servo CNC Torque Wrench
2023-06-27LH61-032 Emulsion Hoist
2023-06-29DA21-050 Pneumatic Angle Drill
2023-06-19CC21-430 Pneumatic Chainsaw (3.0 kw Series)
2023-06-14AN31-7500 Hydraulic Torque Wrench
2023-06-27DA21-022 Pneumatic Angle Drill
2023-06-19AN23-8000 Pneumatic Torque Wrench (Angle Shaft)
2024-03-12DB21-018 Pneumatic Rotary Drill Heavy Duty
2020-06-13CB22-160 Pneumatic Band Saw - Stainless Steel Series
2023-06-16AN31-4500 Hydraulic Torque Wrench
2023-06-27CB61-160丨Emulsion Band Saw
2023-06-17GP61-400 Emulsion Submersible Pump
2023-06-29CC22-530 Pneumatic Chain Saw (5.0KW Series)
2023-06-14AW21-2200 Pneumatic Impact Wrench (Ex-proof Series)
2021-06-15AN22-6000 Pneumatic Torque Wrench (straight shaft)
2023-06-27Accessories
Grinding Disc
2023-06-07Alloy Saw Blades丨CR812 Series
2023-06-06Tool Bits
2023-06-07Diamond Saw Blades
2023-06-06Split Hollow Drill Bits丨DC82
2023-06-07Alloy Sleeves
2023-06-07Alloy Sleeves (Square to Outer Hexagonal)
2023-06-07Rail Clamps丨CB864-12
2023-06-06Alloy Saw Blades丨CR811 Series
2023-06-06Diamond Saw Blades
2023-06-06Carborundum Saw Chains
2023-06-06Alloy Twist Drill Bits
2023-06-06Cross Clamps丨CB862-22
2023-06-06Regular Saw Chains丨CC811 Series
2023-06-06Hard Alloy Hollow Drill Bits assy.丨DB84 Series
2023-06-07Pipe Fixed Clamps丨CB861-12
2023-06-06Oiler
2020-06-13Alloy Saw Blades丨CR814 Series
2023-06-06Sleeve KIT
2023-06-07Carbide Hollow Bits丨DM816 Series
2023-06-06Clamps
2023-06-06Diamond Saw Chains
2020-06-13Carbide Hollow Rail Drill Bits丨DM822 Series
2023-06-06Hard Alloy Hollow Drill Bits assy.丨DB85 Series
2023-06-07Pipe Fixed Clamps丨CB861-18
2023-06-06Cutting Blades
2023-06-07Diamond Saw Chains丨CC813 Series
2023-06-06Alloy Twist Drill Bits丨DB81 Series
2023-06-06Integrated Hollow Drill Bits丨DC81
2023-06-07Carbide Inserts Twist Bits assy.丨DB83 Series
2023-06-07


